
I am using CyberPanel with LiteSpeed Web Server to host my websites. Their pricing is decent and when combined with LS Cache for WordPress, the combination works pretty well.
In this tutorial, we will learn how to Install CyberPanel and LiteSpeed Web Server on CentOS 7. If you are wondering, why CentOS 7 and not the CentOS 8, it’s because CyberPanel doesn’t fully support it yet.
Table of Contents
Launching a New VPS for CyberPanel and LiteSpeed
I use Linode VPS servers for all my websites. Their interface is clean, the pricing is to the point, and I have never had any issues with them. Launching a new VPS server is very easy, it requires only two steps.
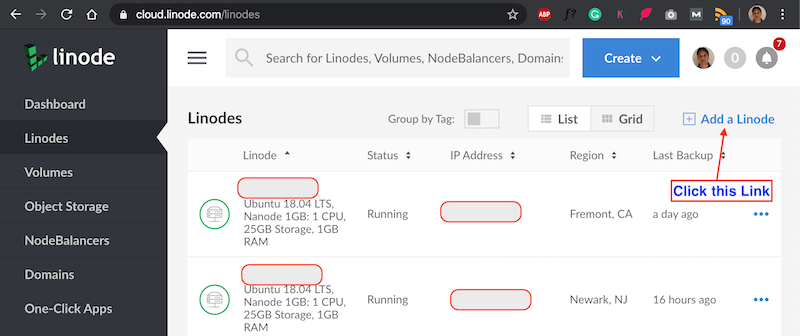
Step 1: Go to Linode Dashboard and Click on the “Add a Linode” link.
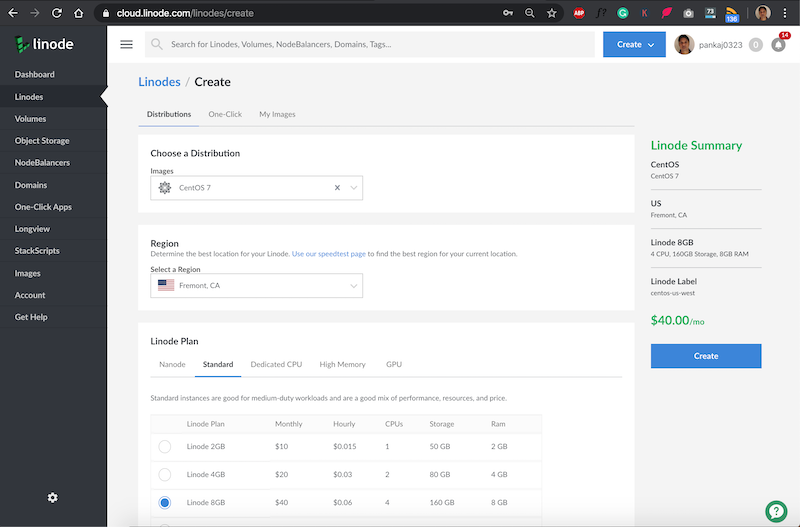
Step 2: Select VPS Operating System as “CentOS 7”, choose region and plan based on your preference. Since I am planning to host multiple websites, I am going with a higher plan here. But, you can start with any plan with a minimum recommended RAM of 1GB or more. You will also have to provide the root password. Once every option is filled, click on the “Create” button.
The VPS will be created and started. Once it’s ready, you can move on to the next step to install CyberPanel and LiteSpeed Web Server on it.
CyberPanel and LiteSpeed Web Server License
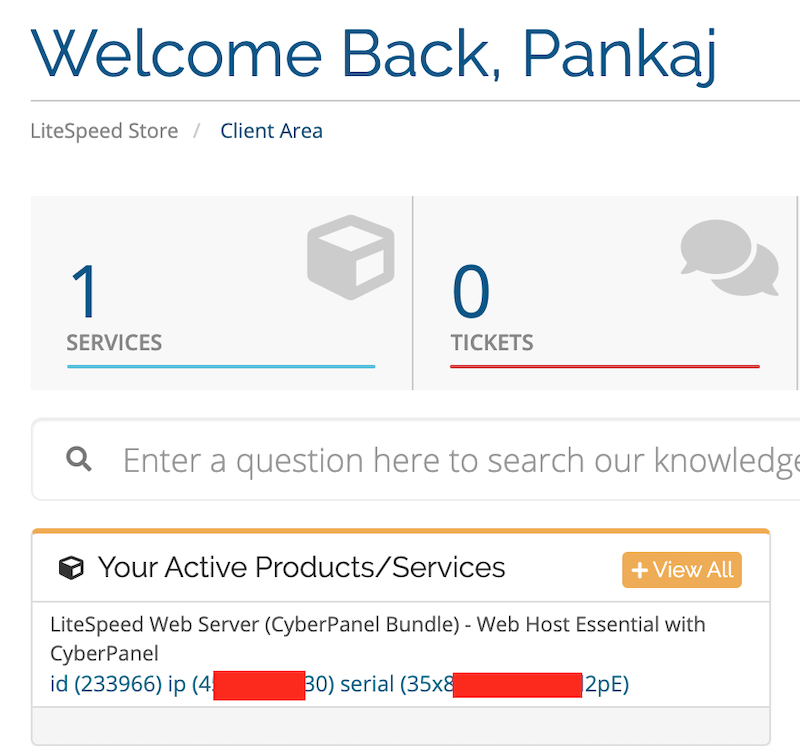
We would need to provide the license key while installing the CyberPanel and LiteSpeed, you can get that from the LiteSpeed store.
Why Not the Free CyberPanel and OpenLiteSpeed?
If you are looking to host a simple website and not planning to make a lot of changes, then you can go with CyberPanel and OpenLiteSpeed, which are absolutely free.
But, if you are hosting a large website or many websites and looking for commercial support then a paid plan is the way to go. And, you can start with their Free Starter plan for 1 domain and upgrade in the future as your number of websites grow.
You can check out the complete pricing table here.
Installing CyberPanel and LiteSpeed Web Server
Now that we have got our bases covered, let’s get on to installing the CyberPanel and LiteSpeed web server in our newly launched CentOS 7 VPS machine. Open a terminal and login to the server using the root user. Note that the installation requires to be run as the root user, the sudo will not work.
Once you are logged into the VPS as the root user, run the below command to start the installation process.
[root@li1176-230 ~]# sh <(curl https://cyberpanel.net/install.sh || wget -O - https://cyberpanel.net/install.sh)
There will be three choices to guide the installation. Enter “1” as the choice to proceed with the installation.
		CyberPanel Installer v1.94

  1. Install CyberPanel.

  2. Addons and Miscellaneous

  3. Exit.


  Please enter the number[1-3]: 1
Then the next choice will come to choose between OpenLiteSpeed and LiteSpeed Enterprise. Enter “2” as the choice to proceed further.
  1. Install CyberPanel with OpenLiteSpeed.

  2. Install Cyberpanel with LiteSpeed Enterprise.

  3. Exit.


  Please enter the number[1-3]: 2
Since we are installing LiteSpeed Enterprise server, it will ask us to enter the serial number.
Please input your serial number for LiteSpeed WebServer Enterprise:35x8-FVp2-Ukla-d2pE
The serial number you input is: 35xx-aaaa-aaaa-aa35
Please verify it is correct. [y/N]y
The next option will be to set the CyberPanel admin password. You can go with the default password (Don’t use this please) or the random generated one too. But, I have a pattern for my passwords that helps me in remembering them easily, so I will go with the option to set the admin password myself.
Please choose to use default admin password 1234567, randomly generate one (recommended) or specify the admin password?
Choose [d]fault, [r]andom or [s]et password: [d/r/s] s

Please enter your password:
aaaaaaaa

Please confirm  your password:

aaaaaaaa
The next questions will be asked if we want to install Memcached and Redis extensions or not. You can install them later also, but I am planning to experiment with them with my websites and improve the speed, so I will go ahead and install them.
Do you wish to install Memcached extension and backend?
Please select [Y/n]: Y

Do you wis h to install Redis extension and backend?
Please select [Y/n]: Y
The next option will be to install WatchDog. I will skip this because it’s still in beta and I don’t want to have it on my production servers.
Would you like to set up a WatchDog (beta) for Web service and Database service ?
The watchdog script will be automatically started up after installation and server reboot
If you want to kill the watchdog , run watchdog kill
Please type Yes or no (with capital Y):
no
That’s it. Now the installation process will continue and it will roughly take around 8-10 minutes. Finally, if everything goes well, you will be greeted with the below message.
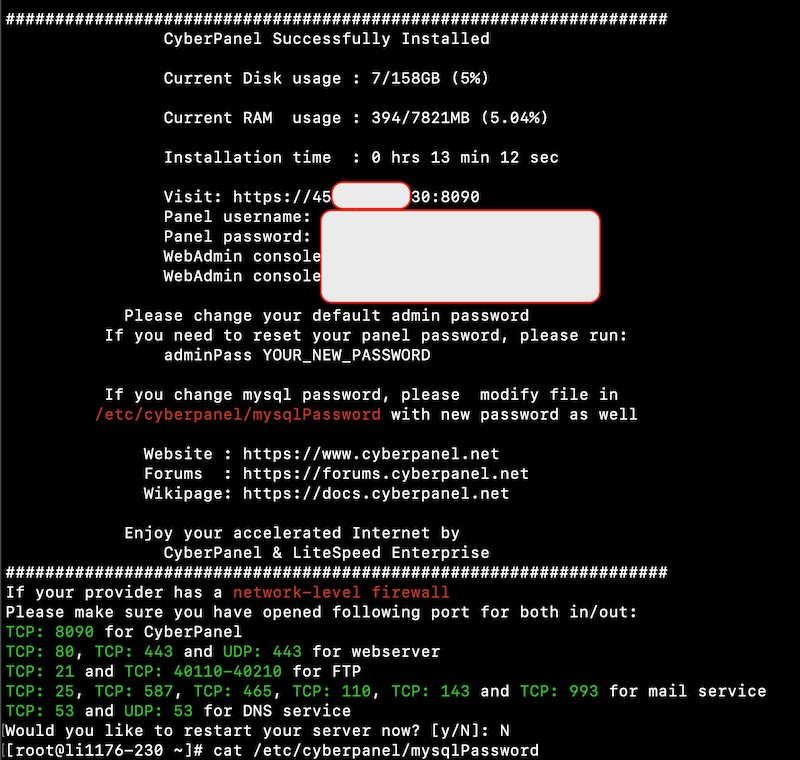
Please note down the “WebAdmin console password”. This will be required to access the LiteSpeed Web Server Admin Console.
You can go to below URLs to access the CyberPanel and LiteSpeed WebAdmin Console.
- CyberPanel: https://ip:8090
- LiteSpeed: https://ip:7080
Opening LiteSpeed Web Server Port in Firewall
When we install CyberPanel, it opens all the required ports except the LiteSpeed Web Server port 7080. Before accessing the LiteSpeed WebAdmin Console, you will have to open this port using the below command.
[root@li1176-230 ~]# firewall-cmd --zone=public --permanent --add-port 7080/tcp
success
[root@li1176-230 ~]# firewall-cmd --reload
success
Where is the MySQL Password?
If you notice the output, it doesn’t provide you the MySQL root password. But, it specifies the file where the MySQL root password is stored – /etc/cyberpanel/mysqlPassword. In case, you change the MySQL root password, you will have to update it in this file too.